How to Draw the Minish Cap, Legend of Zelda
1
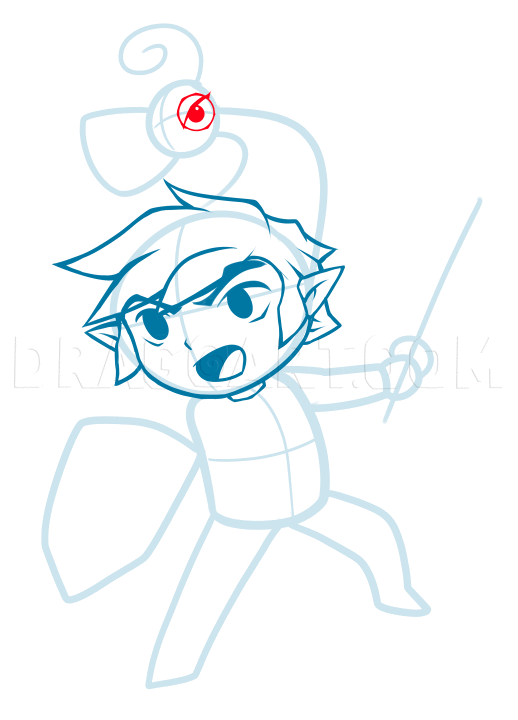
Alright, let's DO IT! *ahem* Let's start with a ball for the head, and a marshmallow for the body. We have a fairly dynamic pose, so the face is looking one way, and the body is facing another. Draw a center line down each shape to show this contrast
2
The arms and legs are very simple blob shapes. The feet are just little triangle toes, so we'll include those in the leg form. One arm is covered by the shield. On Link's head, we'll draw the main curve of the Minish Cap, and a ball for the cap's hea
3
A little more attention to the cap, here. The wedge shape on the left is the overall shape of the open beak. The curly cue on top is... exactly that. A feather, I suppose. Finish it up with the inner curve of the cap.
4
Lighten your guide lines and we'll begin the final line art. As I was working on this, I realized in order to match the art style for this game, I would have to focus less on drawing lines and more on building shapes. If you look closely, each curve
5
After drawing the four main tufts of hair, let's draw the side hair line and the sideburn, which flops around on Link's cheek. Draw the ear as a simple triangle shape peeking out from behind the sideburn.
6
Toon Link's face is pretty much just a round oval or bean shape, but I decided to give him a little dent on one side to give the face a little more shape. Add the second sideburn on that side of the head, and the ear peeking out from behind. On the t
9
Draw a simple shape for the mouth and tongue. Then add a little neck, and oh! There's more hair behind the ear on the bottom. Add a tiny mark for the nose.
10
With Link's head drawn, it serves as a base for the intended star of this tutorial (who inevitably gets overshadowed) -- THE MINISH CAP!!!!!! *cough* The eye is drawn as a simple circle, but we'll mess up the outline a bit to give it a rough look. Th
11
Next we'll draw the top triangle shape of the beak. Play around with the thickness of the line to create interesting shapes.
12
Next add the curves of the lower beak. In the official art, the Minish Cap doesn't have a tongue... but I thought it would be a fun addition for this image. Notice how the curves are almost made of up of smaller straight lines.
14
That little overlap of curves on the front of the neck/cap creates an interesting 3D effect in this otherwise flat drawing style. Try to exaggerate the shape of the feather plume atop his head. We can add the opposite eyelid now, too.
15
I've decided to change the angle and position of the shield in order for it to look more natural. Have the lines toward Link's body be a bit thicker than the rest.
16
Add the inner rim and then draw three triangles for the Triforce image. That little edge on the top right corner of the shield adds a little dimension to the shape.
17
I've simplified the shield pattern a bit for this image. My brain kept wanting to draw the pattern from Ocarina of Time, so this is sort of a compromise between the two designs.
18
Next we're going to outline the body, with the addition of a skirt shape at the bottom. This is just the shirt below the belt, hanging over the legs a bit. The outer edges should follow the outline of the legs. Let's also add a little ball for the sh
19
Now we'll add the belt and the V-cut in his overshirt. I've added quite a few more wrinkles than necessary, mainly because I like how the thick-to-thin lines/markings look on this image. The diagonal wrinkles around his belt give his body a little tw
20
The outline of the legs is thicker in shadow areas, just under the shirt and below the bent knee. It's also thicker around the feet.
21
Using thinner lines, add curves for the top of the shoes and the wrinkle above the ankles. Draw a shape for each kneecap, and add a swirl to the belt. I've let some of the lines get really ragged here.
22
The arm outline it thick at the shoulder, growing thinner toward the wrist. Even though the fingers are all just tiny sausages, try to maintain the organic feel of the outlines.
23
We're viewing the handle of the sword from below in this angle, so the hand guard is a flatted oval with the side edge appearing at the top.
24
Make sure the inner lines of the sword don't touch the outline. Leaving that space helps to make the sword look more dimensional, and not flat. I've added a lot of tiny details here. The wrinkles on the arm lead from the armpit and point toward the h
25
Erase your guide lines, and your final result should look something like this. I actually really enjoyed drawing this. I may use this line art style for more drawings in the future. It's something different to mix things up a bit. In any case, I hope
Comments 0
Details
May 28, 2014
Description: For something a little different, here's a tutorial on how to draw Link wearing the Minish Cap from... The Legend of Zelda: The Minish Cap. I've tried to replicate the official art style. Hope you enjoy!


