How to Sketch a Lion Head, Male Lion


1
Make a mask-shaped oval to form the base of the face. Next, add a tear drop slightly off center of the first oval shape. This tear drop shape will form the upper jaw and nose structures. As the lion is not facing directly towards the drawing's point

2
Add two curved lines to the bottom half of the teardrop shape to form the upper jaw/nose structures. The two curves should meet along the line from the first shape drawn in step 1.

3
Draw a curve across the jaw area to form the bottom lip. The corners of the lion's mouth sag significantly which is why the bottom lip is shaped this way. The chin of the lion should now somewhat resemble a golf club shape. Also draw the upper border

4
Draw the lion's left eye (on the right of the drawing) on the remaining portion of the teardrop shape outline such that the line goes through the middle of the eye. The eye itself is just a circle with the top slightly flattened by the eye lid. The l

5
Erase the remaining guidelines on the face so that only the main outlines remain. Then add outlines of the lower teeth. Note how high above the bottom lip these lower teeth sit – that's because of the sagging of the lips and cheeks that I mentioned

6
With the outline complete, we can start to shade the face. Firstly, I have included a diagram showing the steps involved in shading smoothly. You start by roughly shading a patch of the drawing. Then, smooth this out with cotton pads - use small circ

7
From this point on, we are mainly focusing on the mane. This is the most difficult aspect of the drawing as it involves multiple different techniques and requires a lot of patience. We will start with the mane at the top of the lion's head. In this i

8
There are two important things to avoid when drawing animal fur. Firstly, do not draw long, straight hairs anyway in the fur (unless it is appropriate) as this makes it look unnatural. Instead, try to make every hair at least slightly curved. Shorter

9
Back to the drawing, there are three main steps I followed when doing the hair at the top of the mane. [Step 1] Begin by drawing a bunch of hairs in three different directions (as indicated by the arrow diagram below the first image). Make the lines
10
Now we move onto the regions of the mane on the left and right sides of the head. Drawing these regions requires a very similar technique to that of the top of the mane, but there are a few differences which I will describe in a couple of steps time.

11
Before I explain the process of drawing the fur in these two regions, just take note of how it is structured. The fur comprising the region of the mane around the side of the head sags downward. Also note how there are two ‘tiers’ of fur that com

12
Here is the technique for drawing the fur in these areas. [Step 1] Draw a bunch of soft lines to create the general structure of the fur. Note how in the actual drawing the fur in these areas has a wavy shape. [Step 2] Add more lines until you have a

13
Now we move on to the fur under the lion's chin and under the ear. Again, I will show you the technique to draw this fur in a few steps time, but first I'll show the stages of the drawing.

14
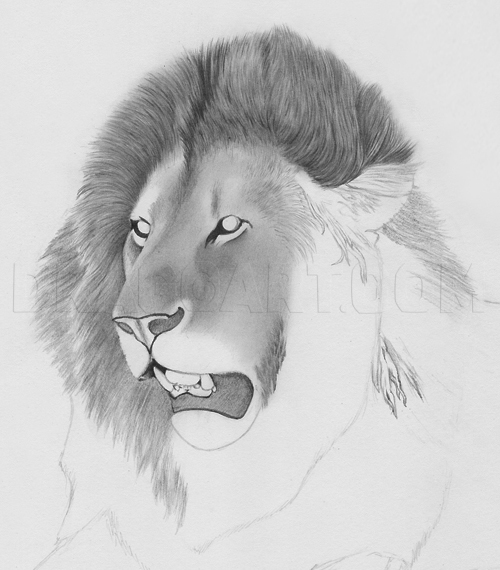
The region of the mane under the ear is the largest and most detailed region in the drawing given its position relative to the point of view. As such, I tried to draw a bit more definition in the hair texture. This involved making strands and clumps

15
This is the process to draw the part of the mane below the ear. [Step 1] Begin with a general outline of some thick hair strands and some hair texture, similar to the other fur techniques described previously. [Step 2] Add more lines and some shading

16
The fur under the chin is very similar, but is curlier and darker. Follow essentially the same process as described in the previous step, but make the hair strands curlier and give them darker and more defined borders. The tips of these hair strands

17
Now that we have done most of the mane, we can move onto the face. The chin of the lion has white, fine fur. The part of the mane immediately below the chin will be completely black, so you can draw the hairs of the chin by actually drawing a dark co

18
Now we start to draw the dark parts of the mane. The dark regions of the mane are found below the lighter areas that we have drawn so far. We have already drawn the boundary between these two regions in the previous steps. We now add a dark fur textu

19
Drawing dark fur is pretty simple, but can be time consuming. [Step 1] Very roughly draw the base layer of hairs with a 2B pencil. [Step 2] With a 4B pencil, add more and more hairs to the texture. [Steps 3 and 4] Keep adding dark lines and some shad

20
In the previous steps, the ear and surrounding area has been developing without any comment from me. It’s now time for you to add this detail. [Step 1] This is the base structure of the ear. Note how the area to the left of it is blank – this is

21
Here you can see how the dark fur at the bottom of the drawing has progressed. We can now start to add the face details. Drawing the eyes involves a simple bullet point for each pupil and then some shading for the irises. Also draw 2 rows of dots for

22
The final step in the drawing is adding some whiskers to the cheek area. This isn't entirely necessary as the drawing looks good without them, but they do add an additional touch of realism. As the whiskers should be white, we will need to erase thin

23
And here is the finished product. You can see that I only added a few whiskers and they are very faint. I tried making them more defined, but I prefer this look. That concludes this tutorial, I hope you found it helpful and have a go at drawing a lio
Comments 0
Details
December 8, 2013
Description: This tutorial explains how to draw a portrait of a male lion. Lions are one of the largest predators on the planet and the second-largest living cat next to the tiger. They are apex predators in Africa and are able to hunt every other species on the African plains (including elephants, although this is rare). This tutorial requires HB-4B pencils, cotton pads/tissues, an eraser and sharpener.


