How to Draw Facial Features, Features of the Face


1
Pretend you are practicing without any worries about making mistakes. Get some paper, cheap typing paper or even a sketch pad. The only other thing you need is a No. 2 pencil (or whatever writing tool that's comfortable to you). We are starting with

2
Now practice drawing the 3/4 view of the eye in this step. The diagonal line gives the perspective to the 3/4 view. Go from step 1 to 5. Once you're comfortable with this try drawing it without the guidelines.

3
Isn't the nose hard to do? Well here is a great way to make drawing them in the profile view a lot easier. Mimic those guidelines that look like an elongated teepee. Get this shape sketched in--again, don't use a ruler. This will help you to freehand

4
Here is a profile picture of a woman and man of about the same size. Notice the differences in the eye, nose, mouth and chin placement. Also the man's brow sticks out more, is larger. And the woman's nose and lips don't extend as far, but her eyes ar

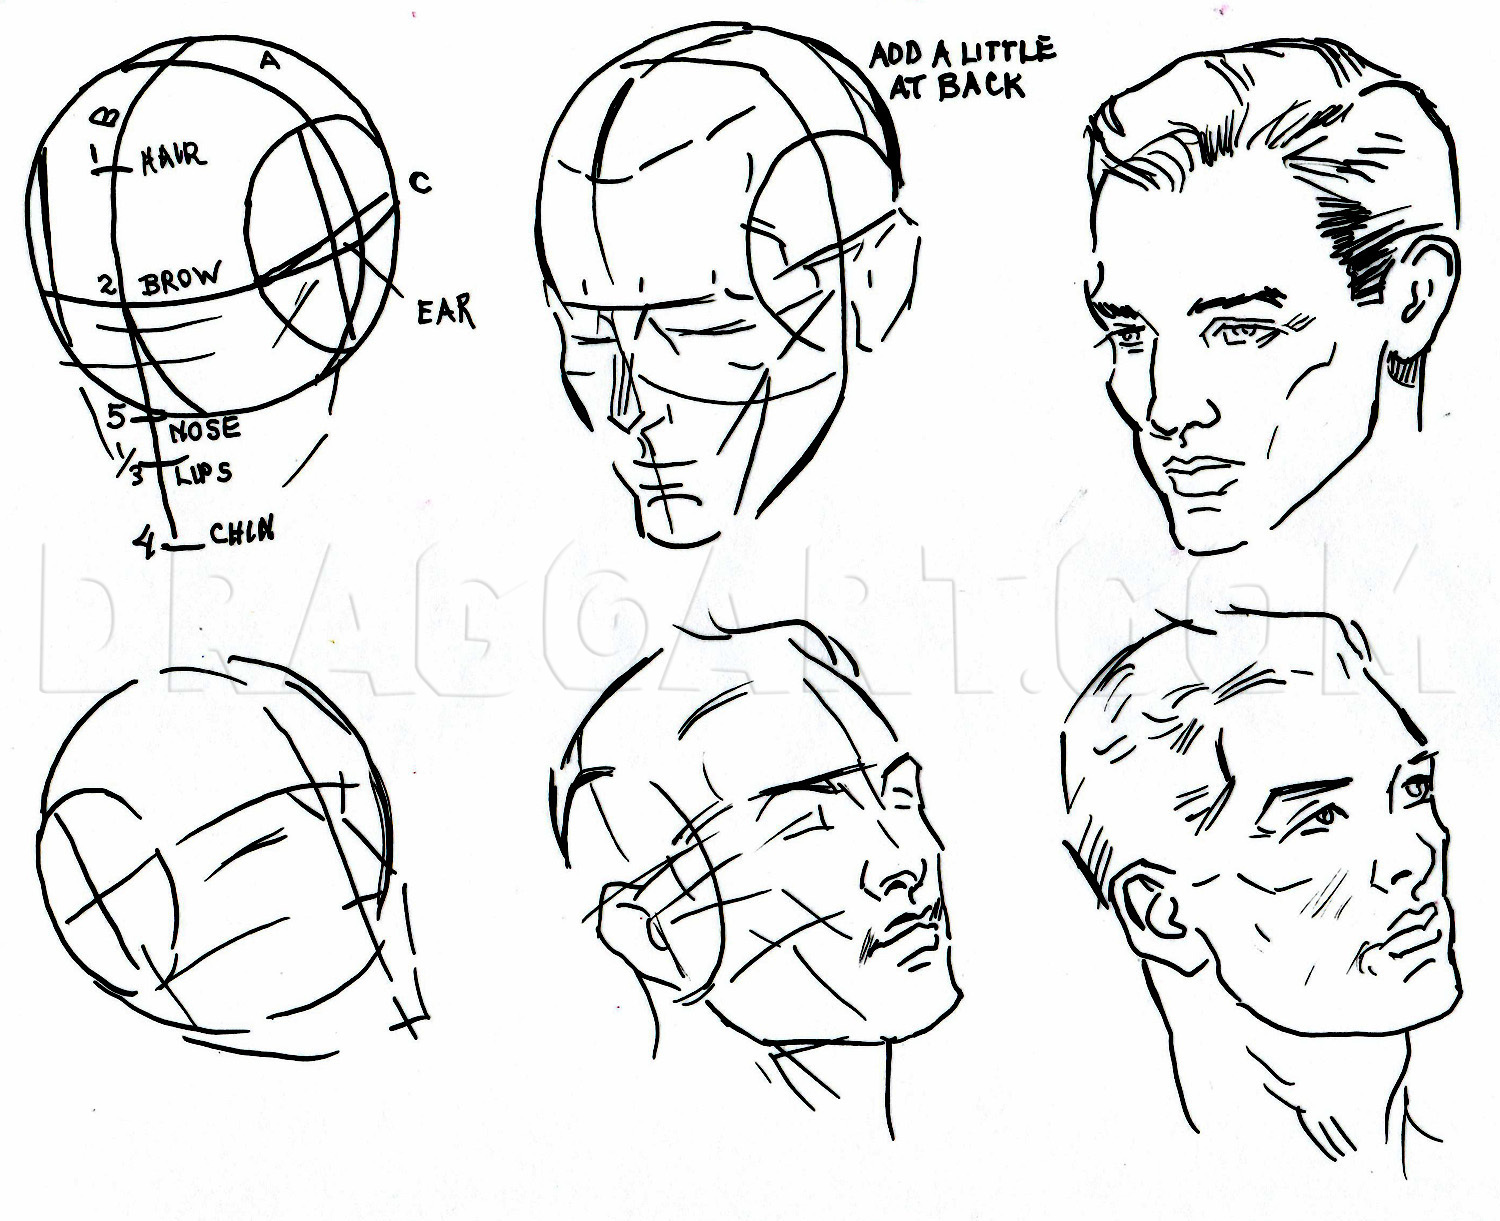
5
Looking at the profile picture of this step, draw lightly a ball. Then divide it in half. The lower section divide into three sections. Section between lines 1 and 2 gives your ear location. Section between lines 2 and 3 gives the phylum, lips, and c

6
Front view portraits can be a pain if you don't have a way to get their likeness. With no grids, scaling device, etc., it can be disastrous to do it freehand. BUT... strangely, I already had these techniques in looking at the features before any of t
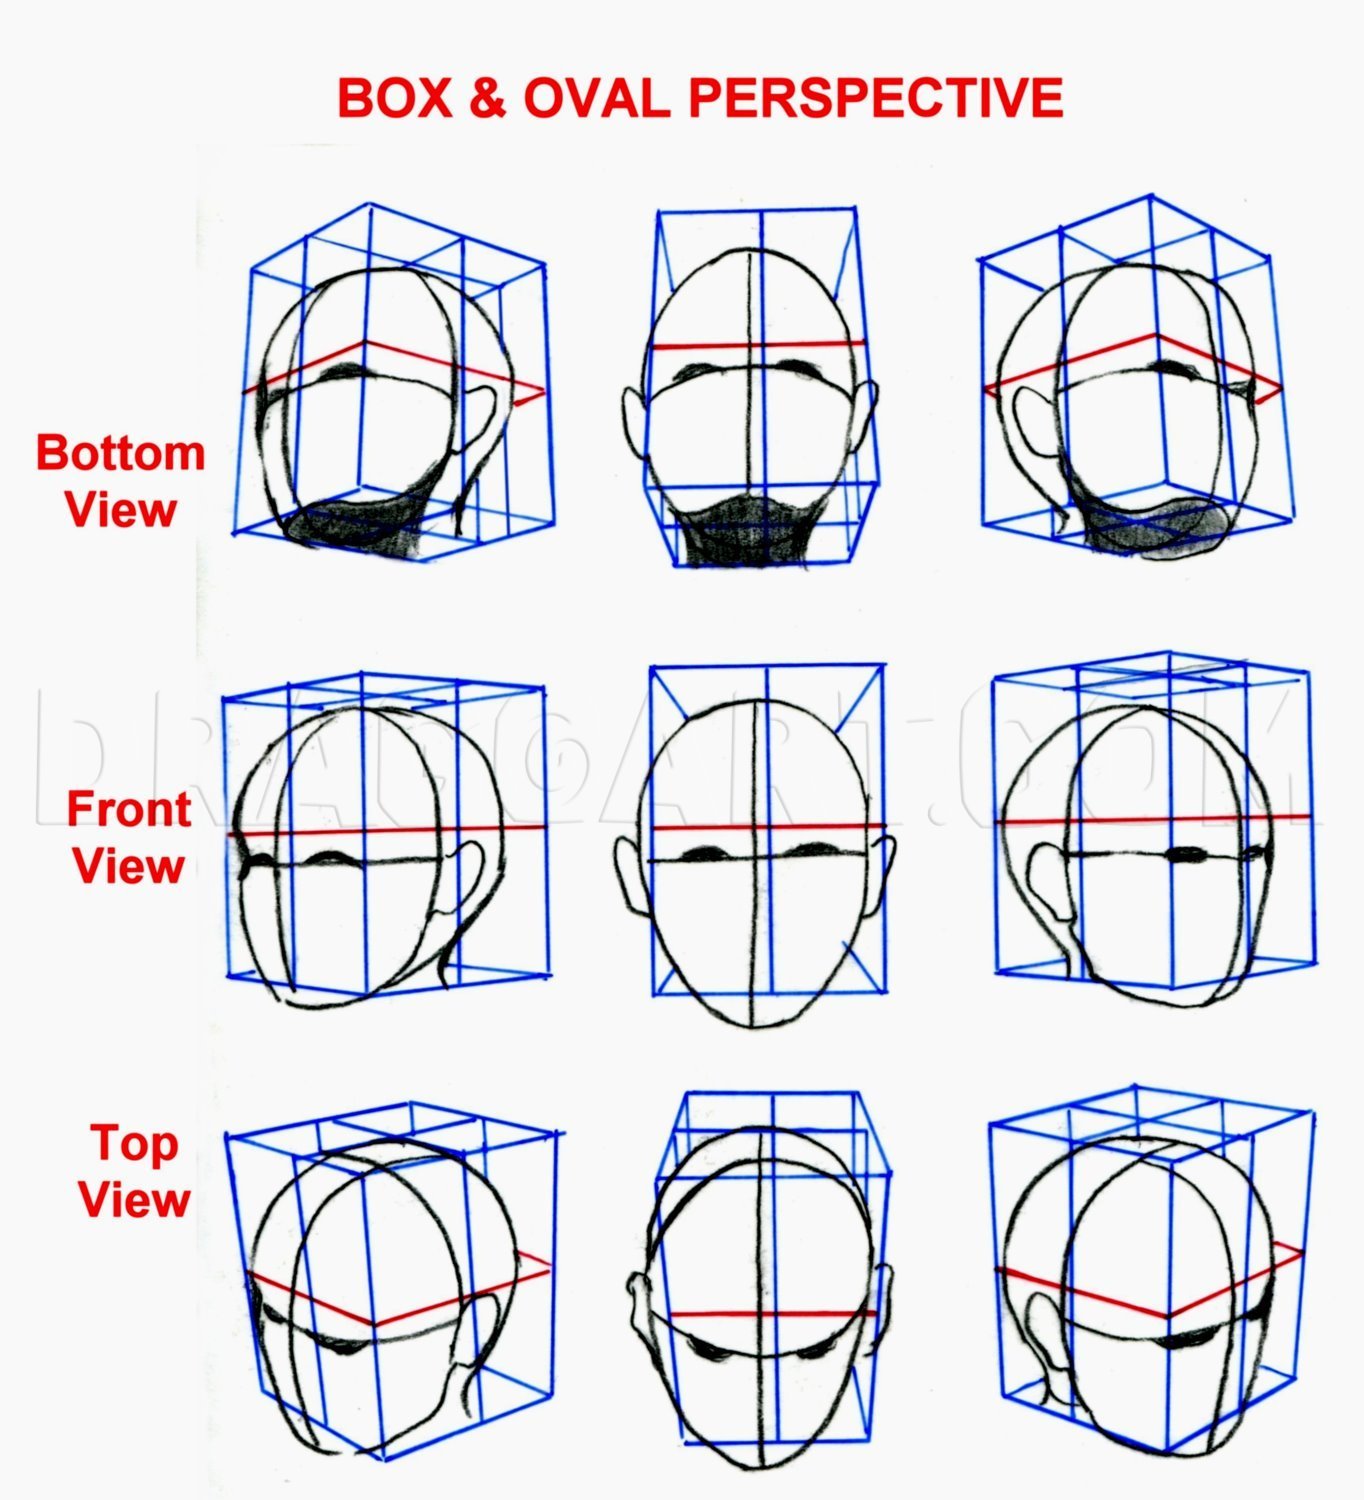
7
Here is a great help for that pro perspective look, draw the box --front, sides, and back. Then draw the oval of the head and a center line across for the eyes and center line down to divide the face. You can practice from the models. Notice the eye

8
A great way to get your features and head pose is by drawing in the cross and middle line. Don't worry about getting your drawing's features. Just make simple drawings of the ball and facial plane. This all helps with adding a general placement of yo
9
This is another great exercise with the ball flattened at the edges (for ear placement). This of the head as a ball, flattened at the sides, with the facial plane (lower part) added. Those lines help with the facial features too. Here are two differe

10
Facial features are the building block to great expressions. Here are some to work from. BUT the best way to stay fresh and keep you work real is to carry a sketch pad and pencil with you. Draw from real life--babies, children, men, women, the elderl

11
Here is the beginning of drawing the introduction picture. (1) From the first picture, draw the oval lightly with a No.2 or HB pencil. Make sure you draw it as seen in the picture. (2) The second picture, draw in the bisecting red line to balance his

12
Sketch lightly the crescent red lines for hair line and head mass.

13
You can draw in the lines a. for eyebrows, b. for eyes, c. for nose, and d. for mouth.

14
Now draw in the boy's eyebrows (use those feathery short strokes for the hair), eyes, nose, and portion of his mouth. Observe where these features appear in relation to the guidelines.

15
Now draw in the magnifying glass and shade it in. If you have difficulty drawing circles, try a jar's lid, pencil compass, template, rim of glass, etc., that's the size you need. The outer lined edge is the outer reflective light.

16
Now draw in his hair, ears, lower lip, jaw, and neck. If you haven't already, you can erase your guidelines.

17
I made this line drawing especially for you if you don't want to do the pencil shading and blending part. Otherwise, let us continue to the pencil drawing part.

18
Here is the outline done with a 0.7mm mechanical pencil. Look closely and see if your lines look something like this. You can erase if certain areas like the eyes or nose don't line up. Take you kneaded eraser and dab off the shadow outlines or dark

19
PENCIL STROKES & TONE, SHADING, TEXTURE -- For your convenience, I have inserted this step with different pencils, strokes to use. And you can study the shapes that make up this drawing universe, along with tone, shading, and texture.

20
(1) Sketch in the first picture with the No. 2 pencil and make sure it is sharp. You can sketch in diagonal lines, lightly. Also darken areas on the magnifying glass to match picture. (2) The second picture blend with a stump in the large areas, incl

21
This is the first start with the pastel application. I Applied medium gray to his face. Added dark gray to his hair and collar. Looks like a mess, but that's how a some beginning projects will appear. Keep patience with you and keep applying those la

22
Here I used my blending stump to "draw" in more lines, add more shading to his hair eyebrows, mouth, and ears. I needed to lighten areas like the magnifying glass handle and whiten catch lights in his eyes and did this with a kneaded eraser.

23
Basically, I added more highlights with Opaque Watercolor to the catch lights in his eyes, lips and magnifying glass reflective light. Now our kid with the magnifying glass "pops" out! The white background was cleaned up in photoshop. Now, To help ou

24
Without highlights, your picture would have a flat appearance. Click on this picture to learn how to make your own picture POP out! I am closing out now. But you all have been wonderful and it has been a great pleasure to do this tutorial with you.
Comments 0
Details
September 9, 2012
Description: The eyes, nose, and mouth are the main facial features this will tutorial focus on. How to simplistically draw these features & an easy way to get them in the right location may seem hard and to top it off, everyone isn't shaped the same. But my tips will give you a general guide on what to look at and where to start. So the next time you're looking at a blank sheet of paper, worry not, you will have a bit more confidence to draw the first line. The main key, if you're serious about drawing, is to practice, practice and practice. I suggest you fav this because it is a very good study tool. I hope you'll enjoy this tutorial. Please fav, show your love, and comment. Thank you all. Peace and love to you.


