How to Draw a Barn Owl


1
Begin by drawing two ellipses as shown.

2
We now can begin the outline of the Owl. Using the ellipses as guides, add the details as shown. Bear in mind that the elliptical guide lines will be erased at a later stage.

3
Add further outlines, again making sure to keep them light and not to indent the paper.

4
Now that we have a good sense of the shape of the Owl we can begin shading. As you work on each section of the drawing, erase the guidelines so that they are very faint and then begin to shade the area. Make sure you do not erase all the guidelines a
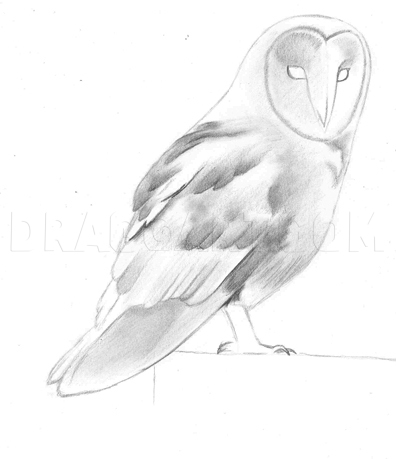
5
We can now begin to add the details to the feathers. Make oval shaped borders around some of the shaded areas as I have done to form distinct feathers. Make sure you look at a reference picture when doing your own drawings to help you draw a realisti

6
Now we add the less defined feathers to fill in some of the gaps in the wings. Shade small half-ovals with a pointed end in rows, almost like scales, in the white spaces as I have done.

7
Now add darker details to add more contrast to the drawing. This also makes the feathers appear more three dimensional. Again, if you are drawing from a different reference picture, make sure you take careful note of where the shadows are to ensure t

8
Continue to add details. Make sure that the feathers don't look too smooth. Add scratchy lines to the feathers and plumage to make them look more realistic - but don't apply a lot of pressure or else risk making an irreversible mistake.

9
The owl has dense fur around the legs / down the front of its chest. This requires a different technique to drawing the feathers - see my tutorial on "How to Draw a Realistic Tiger" to see tips on drawing fur.


