How to Draw a Cherry Blossom


1
Draw a circle and be sure to make it to the size of your cherry bloom.

2
Just like the other lesson we did on a blossom, you will draw a smaller circle in the center of the flower, and then add some spurs like so. It should almost look like a wagon wheel.

3
At the ends of each spur, draw in more small sized circles like so, and then move onto step four.

4
Now you can begin drawing out the flower pedals and as you can see they look similar to clover leaves. Draw a total of three for now, and later you can sketch out the rest.

5
Now draw in the rest of the blossom pedals like so, and then move onto the last drawing step where you will finish this bloom tutorial.

6
Sketch out the leaves which should also be drawn out with serrated edges, and then erase the guides you drew in step one.
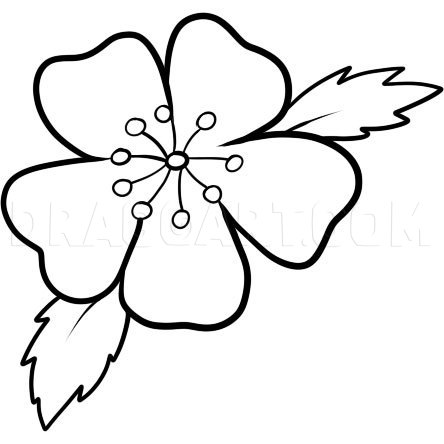
7
Here is what your drawing should come out looking like when you are all done. Now you can have even more fun coloring it in.
Comments 0
Details
May 23, 2011
Description: Hey ya'll, Dawn here with another fun flower lesson. I swear after this, there will be lots of fun anime and animal tuts to come. I've spent a little while on this flower, it was easy which is why the tutorial is very easy to accomplish. “Drawing a Blossom” should be taken with preparation, like having a pencil, paper, and eraser ready before you leap into any drawing work. When you draw this blossom, draw the middle first before adding the petals and leaves. Did you know another name for this flower is “Sakura”, it's pretty cool and I know it's the name of the popular female Naruto character. Anyways, get ready for this fun packed lesson; creating it was definitely joy filling. Stay tuned for more epic lessons in the future, and don't forget to checkout my YouTube for free quality drawing videos. Thanks for viewing, ya'll!


