How to Draw a Realistic Person, Draw a Real Person


1
So before starting the drawing it helps to sketch out a few subjects until you are in the mood for the actual drawing. I just spent about two hows on these watercolor pencil/pastel drawings while thinking of an idea.

2
Here were my tools of choice for this drawing. In addition to the 12 Derwent pencils, I also used a 3H and 6H pencil of another brand(for light shading). As for erasing, I relied on my kneadable eraser. I really prefer textured paper to smooth right

3
Alright, so it will help if you sketch out a few figures before hand. This is how I like to sketch mine out. Start with a stick figure with circle joints.

4
You can continue on by sketching in the basic form of the body while keeping the stick figure skeleton in mind.

5
You can eventually go in and solidify your lines and do some simple shading. Remember that these are just sketches and that you shouldn't get too caught up in them.

6
Alright so here are some figures drawn using the previous technique.
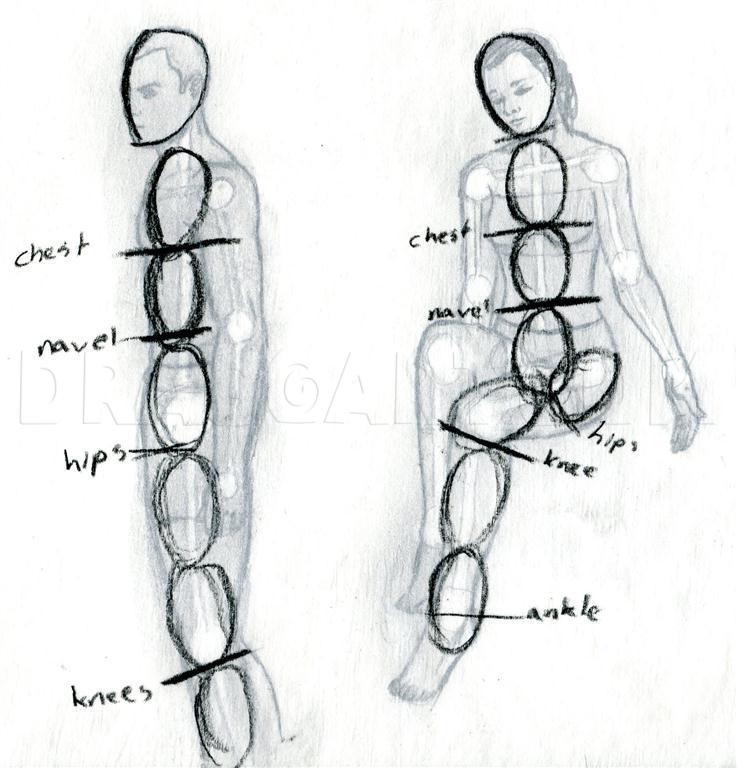
7
Proportions can be super helpful when trying to draw a figure. Instead of sticking to a strict set of proportions for all of your people, try changing it up. If you get some tracing paper and put it over pictures of people, you can see how proportion

8
So, let's jump into the main part of the tutorial. Instead of starting my drawing by basing it off of a reference image, I chose to try and sketch out mu own pose. This was the original idea. Use something between an HB and 4B pencil and keep it ligh

9
Here is my further development of the figure. Still keeping it light and aiming more a less for a simple mannequin.

10
Now you can start sketching in the basic form of the body. You can see how I deviated from my original sketching in regard to the arm. If you notice that something isn't going to work out in the drawing, don't hesitate to change it.

11
Continue by shading a grey into the background and working on defining a few lines here and there. Remember to still keep your lines fairly light regardless of how dark you make them.

12
Keep going around the drawing and defining the figure. Sketch in the clothing and start adding basic details to the head.

13
Keep on defining. Use the kneadable eraser to eraser and you lighter pencil (H-B) to start working in different values and shades.

14
Start using some darker pencils now. I decided to make her hair and the shirt the darkest parts of the figure. I used pencils between B and 5B.

15
As you go around shading your figure, you may as well also start sketching in your background.

16
As you go around shading your figure, you may as well also start sketching in your background.

17
I think backgrounds add A LOT to the figure and it's fun to free hand a background to fit your figure. Aim to have strong contrast between your figure and the background.

18
So keep going back and forth between the foreground and background. Notice how the figure keeps popping out more and more as you add more values to the background. Try not to make a thick outline all around your figure. Instead, do your best to try a

19
So here is the drawing with everything developed. All that is left to do is to try and balance out the values and shades. Use all of your pencils, H-9B, to create a greater range of values and make your drawing more vibrant.

20
And here we have the finished product. I could have gone on forever and ever trying to fix minor details, but forever is a long time! I learned a lot from making this tutorial and have a few ideas for tutorials on things that I need to work on. Anywa
Comments 0
Details
April 16, 2011
Description: Hey guys! I haven't put out a realistic person tutorial in a while and am pretty stoked for this one. I hope everyone can get something out of this tutorial and improve on their own techniques. Let's get started!


