How to Draw a Water Lily


1
Begin by making two sets of circles with the outer shape being more like an egg, and the inner shape like a yolk. Next, draw the stem line too.

2
Now starting in the inner circle for a guide, you will begin drawing out some of the lily petals. Its best that you start from the bottom and work your way up the bloom. There is seven petals to draw in this step so take your time to get perfect resu

3
Now that you drew in some cone shaped petals for your lily, you can now draw in three larger shaped petals that will act like a resting bed for the smaller petals. Once this is done you are ready to move to step four.
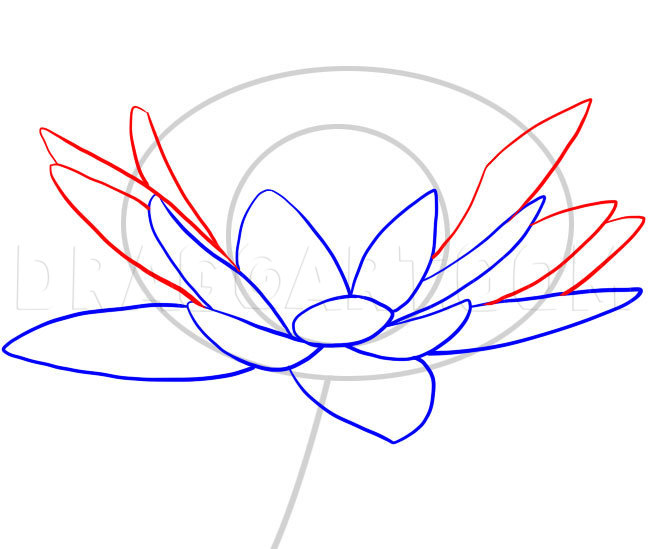
4
The lily petals that are going to be drawn from both sides should have sort of an arch to them since these are the petals that start forming the roundish shape for the lily. There is three cone shaped petals on each side that you need to draw in, and

5
Continue to draw lily petals but this time have them drawn in a spiked position like so. The petals at the top of the flower are more erect and sturdier then the bottom, and outer flower petals.

6
Keep drawing in those petals like so, and when you are done, you should have a crown formed at the top of the lily like so.

7
Now you are ready to draw in the center of the lily which is filled with hair like stamens. Take your time with this step so the center comes out nicely drawn.

8
Now you are ready to finish off the flower by drawing in the thick stem. The lily stem is very strong, so be sure to draw it the way you see it here. Erase the lines and shapes that you drew in step one.

9
Here is what your flower looks like when you are all done. Now you can have even more fun as you color in your newly drawn lily. I hope you had fun guys as I taught you how to draw a water lily.
Comments 0
Details
February 28, 2011
Description: As you can see from the video lessons on the front page, you will be getting another tutorial on the water lily but this time it's going to be in a step by step version. I have a lesson from a while ago on this pretty flower that floats on the water, and to tell you the truth I thought it could use another cleaner version because the older one is a little messy. I'm just going to be brief with this tutorial description on "how to draw a water lily", step by step because I already submitted the video drawing lesson earlier today. I had fun redrawing this flower, and since it is a popular bloom, I think you will enjoy this submission too. The reason why I love these flowers is because they are so beautiful and dainty looking. The water lily are perennial plants that usually grow in dense batches or colonies. The leaves of the water lily are larger then the bloom, and they form a perfect circle with a perfect slit that looks like a mouth or PAC-Man. They are very green in color, and they float at the top of the waters surface. The lily can be found right near their pads, and each flower has about twenty five petals with a bright yellow center. They are also very fragrant, and lilies can be found in different shades. Whats nice about the water lily is how they sleep at night, and awake with every sun rising day. What I mean by that is, with every morning that passes the lily opens up in full bloom, and when the sun sets in the late afternoon, the flower closes to sleep. I really had fun and if you are a big flower fan, you will enjoy this tutorial too. See ya folks, and remember to keep those eyes peeled for more drawing fun.


