How to Draw Grimlock, Transformers Age of Extinction


1
Let's begin with a guide drawing. Begin by drawing a circle for the base of the head. Then draw an oval-like shape for the body.
2
Next add the upper legs, lower legs, simple lines for the arms, and a large curve for the tail.
3
Next we'll begin the final line art. We'll be drawing complex shapes for almost every step. Be sure to step back and look at the whole image to be sure the proportions are correct. Let's start by drawing the nose and upper cheek bone of Grimlock's di
4
Next we'll add the angry eyebrow and horn. Use bold curves and try to end your shapes with a little spike in order to give him an aggressive feel. Though he's a robot, his parts have a very organic feel to them.
5
Next we'll draw the lower jaw and chin. Note the opposing curve at the front of the mouth on the upper and lower jaws. Keep it nice and round.
6
Now we'll start adding the first rows of teeth, along with the tongue. For the top teeth, keep them at a medium size. Nice and pointy. Just generic sharp teeth. On the bottom, there's more of a pattern to the jaw's layout. There's a handful of longer
7
...and now we'll add the smaller teeth on the lower jaw. On the upper jaw, we're clearly adding a full second row of teeth with larger fangs.
8
Now thinks are starting to pick up. We'll add some more long teeth to the upper jaw, and then outline a silhouette of the teeth on the far side of the jaw. After that, we'll begin adding rib-like armor running down the sides of the neck. Then we'll a
9
Draw two tube-like shapes running down the front of the neck. Then let's move outward and draw the forearms and tiny, 2-clawed hands. The lower claws are in a relaxed pose. The upper claws are in a more dynamic position.
10
The upper arms on Grimlock are more like a human's upper arms than a Tyrannosaurus'. Shoulder. Biceps. Triceps. Plus some armor plating.
11
Next we'll draw the thigh armor on the leg closest to us. Though it's covered in somewhat random organic detail, the overall shape is like an upright almond.
12
Now we'll add the lower leg, which is essentially an armor-plated chicken leg, and three large toe claws.
13
Continue adding detail to build the foot. Then we'll start outlining some ribs that run down the entire chest and belly.
14
Now we'll move on to the opposite leg and start building the armor plates on the thigh. The line work is simple. Stick to L and M shapes. It's like writing the number 7. Overlapping the lines creates that layered appearance.
15
Next we'll build the lower part of the thigh. Same principle, except we're repeating a curve and a straight like, like the bottom of a 5. Your hand should already be used to writing a 5, so let your muscle memory do the work.
16
From this angle, we can better see the extreme angle of the lower leg joint. Adding curves to each side of these shapes gives them a slightly cartoony feel.
17
Add the claws and detail of the toes. Then we'll move back to the body and complete the ribs we started earlier. They overlap and become shorter and narrower as they travel under the body. Up on the chest, we complete the shape of two breast plates.
18
Next add the shapes of the shoulder blade, and the back of the neck and body.
19
Continue the curve of the belly between the legs and around to the back. The tail curls around to the opposite side of the body. To draw these trilobyte-like shapes, first figure out where the center line on the top of the tail is. That's where your
20
Picking up the tail on the opposite side of the body, let's first focus on the bottom and side of the tail. These V-shaped plates overlap and become smaller as we approach the end of the tail. Try to maintain a smooth curve, even with these separate
21
Now we'll draw the spines on the top of the tail, like shark fins.
22
As we reach the end of the tail, the top and bottom portions merge into simple shapes which end in a point.
23
Here we can go in and start adding fine details to the metal parts. The face/skull is broken up into many sections... kind of like a real skull, actually. The next focus is the soft underside of the neck, which is lined with horizontal plates the wra
24
The detailing continues! There's almost no end to the detail. Be sure not to over-detail your drawing, though. Pick the most prominent details to replicate in your drawing. Otherwise the entire image will turn to mud. Even here, I ended up deciding t
25
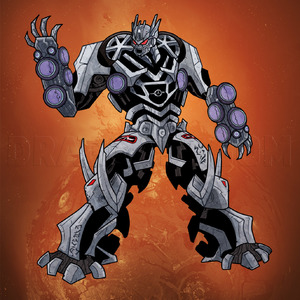
And we did it! What seemed like an impossible task is now complete! Movie Grimlock! *shakes head* This was a real beast to draw, but the results are well worth it. Even if you had trouble following along, you can still use the basic steps to build a
Comments 0
Details
May 9, 2014
Description: Transformers again! Well, movie Transformers, anyway. In this tutorial, we're going to attempt to tackle Grimlock from the upcoming film, Transformers: Age of Extinction. It's quite a departure from his G1 counterpart, but it's certainly interesting. Let's draw!