How to Draw a Dragon, Realistic Dragon


1
Let us begin with a circle which is going to be used for our head guide.

2
Starting from the head shape you just drew in step one, you will begin sketching out the snout of the dragon, all the way up to the forehead and back jaw line up near where the temple is going to be. Add a small horn on the snout like so, as well as

3
There's many types of snouts to customize your dragon in. I like to range the mouths and teeth for my creations because it adds contrast to the overall creature. Just keep in mind, dragons with an abundance of angular features will always look violen

4
You will now begin sketching out the brow of your dragon. Notice how it is arched high, and well defined once you add the inner lid of the eye under the brow like you see here. The ends of the brow also have some spiked tips.

5
Next up, draw the shape of the dragon's eye and be sure that the upper lid is nice and bold as well as defined and realistic. Make the detailed lining under the eye which is also the cheek. Make some definition lining around the edge of the muzzle to

6
It's now time to draw out the entire jaw structure for your new dragon creation. If you notice, the jaw and or structure of the whole shape sort of reminds you of a dinosaur. Sketch in the long, thick slithering tongue, then add the sharp teeth on th

7
You will now begin drawing the rest of the dragons teeth for both the upper and lower parts of the gum line and or jaw. Once the teeth is drawn in, you will also need to sketch out the membrane tissue that is stretched as the dragon has his mouth roa

8
Lastly for this drawing step, draw in the rest of the dragon's head. Notice how there is three very thick horns attached to the top in a crowning design. There is also a smaller horn on the cheek or side of the dragon's face. Sketch out the curved sh

9
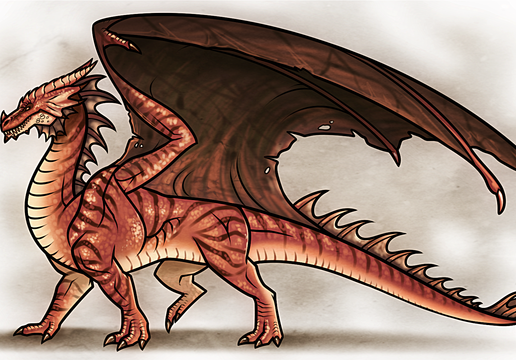
This is it. The final line art is all done. Color in the drawing using the tools of your choice. I hope you enjoyed this tutorial on drawing another dragon. Also, be sure to view the tip steps below that will aid those of you that color digitally.

10
I've recorded my basic progression within the overall painted piece. Please note that I am use 'Adobe Photoshop CS3' to digitally paint my drawing. Through the next three steps, I'll show you how I panted the individual details. First, I color my bac

11
Next, using a semi-bright color, I go ahead and add scales throughout the drawing in a subtle pattern. Because we're painting a dragon, they will have scales ranging in various sizes, like dinosaurs. Unlike snakes, having evened patterned scales, a d

12
Repeating my process throughout the entire piece, I go ahead and darken the contrast by choosing 'Image > Auto Contrast'. This contrasts the overall piece to a more appropriate depth. Afterwards, I go ahead and create a new layer, set it to 'overlay'
Comments 0
Details
April 3, 2012
Description: So watching various YouTube videos on the diverse processes of artists, inspired me to paint in my own style, compiled from the many I've seen. As an artist, it's crucial to develop your own style to stand out from the crowd. In this new dragon tutorial, I will show you the painting process on how I colored my dragon digitally, plus, a few tip steps on the many customizations of a dragon's features. For the coloring part, I'd recommend getting yourself a digital painting program like Corel Painter 12 or Photoshop CS3. Whatever the case, practicing and watching others paint and draw is probably the best way. You learn so much just by watching, and by just 'doing it', you will advance as an artist faster than you know it. Anyways, I had so much fun experimenting with this, I hope you guys will enjoy my tutorial on 'how to draw a dragon', step by step. Enjoy and have fun!